How To Create Scheduled Posts On Facebook Page
If you think other social media apps have overshadowed the potential of Facebook, then you can't be more wrong.
Facebook still rules over the online world and is the go-to platform for experienced marketers.
However, most beginners are disappointed with their reach metrics because of ill-planned scheduling, or worse, no scheduling at all!
Scheduling is essential because it enables you to post content at times apt for engagement. How does it do that? Well, it ensures that your post is consumed by a diverse audience in different time zones.
There are two ways to schedule your Facebook posts, so you stay efficient and focus on closing more deals.
- Scheduling natively on Facebook
- Third-Party scheduling using SocialPilot
Third-party services apps like SocialPilot can easily keep track of your social media activities in addition to providing regular updates and insights.
Interesting fact: With SocialPilot, you can bulk schedule up to 500 posts with images.
So first, we'll discuss how Facebook scheduling is done using 'Creator Studio' and then move on to exploring SocialPilot.
But here's a quick disclaimer. Remember that you will need a business/group page to schedule a post using Facebook's Creator Studio natively. Also, note that this won't work for regular profiles.
How to Schedule a Post on Facebook?
Follow the below steps to schedule a post on Facebook using Creator Studio.
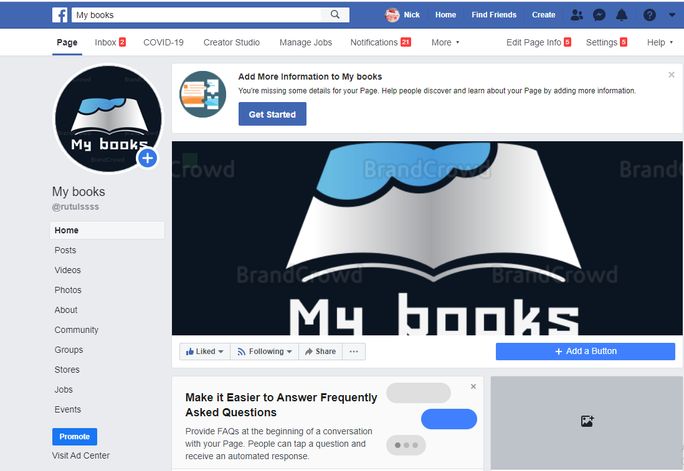
Step 1: Once you open your Facebook page group, select 'More Option'. Under its drop-down menu, select 'Publishing Tools'.
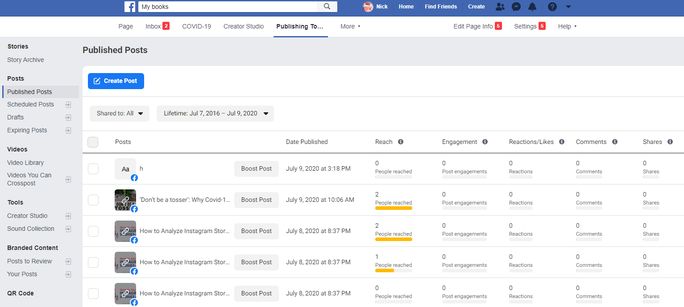
Step 2: In the 'Publishing Tools' option, select 'Creator Studio'.
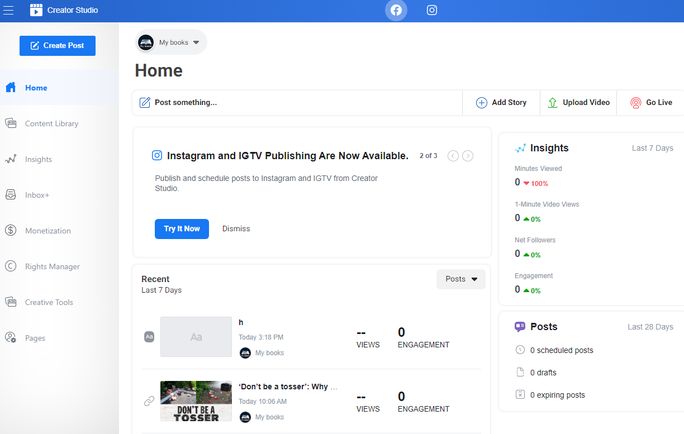
Step 3: 'Creator Studio' opens. This is the page from where you can schedule your posts and keep track of most activities.
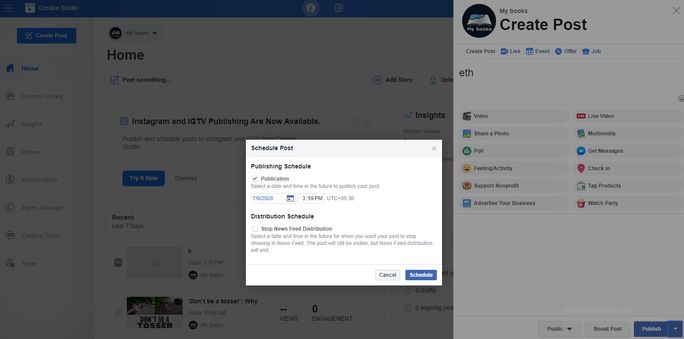
Step 4: Click on 'Create Post'. Once completed, you will see a dialogue box that has a publish option. In the drop-down menu of publish, select 'Schedule Post'. Set your preferred date and time for posting. Hit on the 'Schedule' button and you are done.
You can use an alternative to Facebook Creator Studio for even easier and more advanced scheduling.
How to Reschedule or Delete a Scheduled Post on Facebook?
If you want to ramp up your marketing strategy at the last moment or have to delete a post because of some typo, here's how to do it.
Step 1: In the Creator Studio, you can reschedule your scheduled posts if required. All your scheduled posts are accessible in the content library's Posts section.
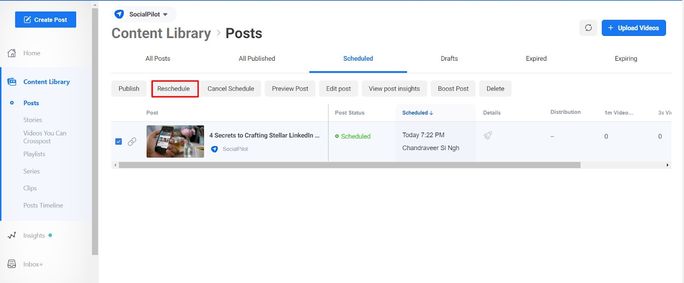
Step 2: Rescheduling follows the same procedure as that of scheduling. Click on 'Reschedule' and select the new date and time for posting. Tap on the Reschedule button.
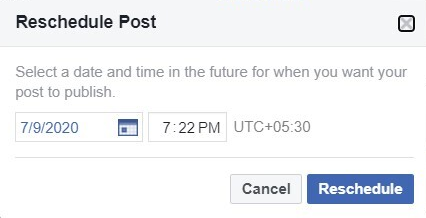
Note: When you are posting content, the timeline considered by Facebook is always aligned with your current timezone by default.
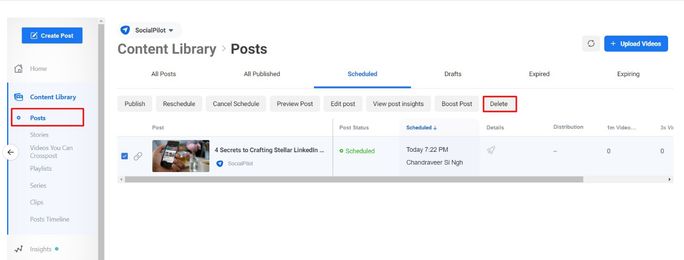
Step 3: If you want to delete, then select the 'Delete' option from the content library's Posts section and remove those undesired scheduled posts.
What are the Pros and Cons of using Facebook's Creator Studio?
Creator Studio is a fantastic feature offered by Facebook. It is handy if you are looking for a simple way to schedule posts. However, let's take a look at its pros and cons before understanding the benefits of third-party social media marketing platforms.
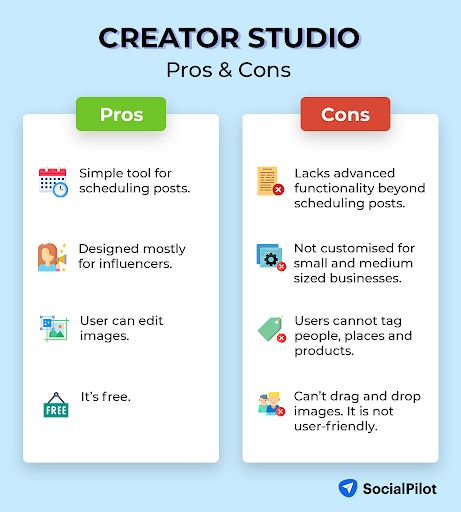
Also, you need to understand that Creator Studio is different from Facebook Business Manager. Business Manager serves a different purpose; it's mainly for advertisement. It allows you to set the parameters for the ads, their preview, etc., which is entirely missing in Creator Studio.
Creator Studio is a good option for influencers or individuals looking to automate the posting process and expecting nothing more.
If you are looking beyond scheduling and posting and want to attract more leads, you should use third-party scheduling tools.
How to Customize and Schedule Facebook Posts using SocialPilot?
Third-party tools go beyond scheduling options and enable hassle-free auto-posting facilities. Although other tools enable auto-posting facilities, with SocialPilot you can customize and bulk schedule up to 500 posts with images at a cost-efficient price.
Bulk scheduling is a convenient way to post a large number of posts using a CSV or text file without scheduling them manually. We shall discuss more about this later in the blog. Before that, let's see how SocialPilot enables you to customize your Facebook posts.
To get started, log in and connect to at least one account. You can also connect multiple Facebook accounts and other social media accounts. Once connected, select that particular account for scheduling.
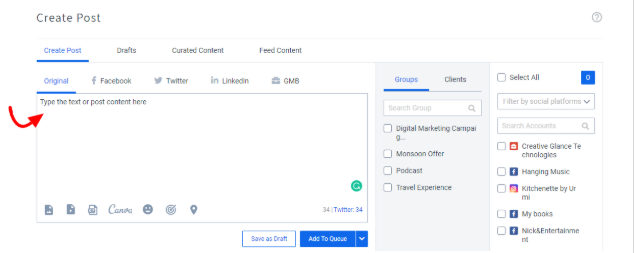
To customize, go for the 'Create Post' option. You will be able to perform the following activities from here:
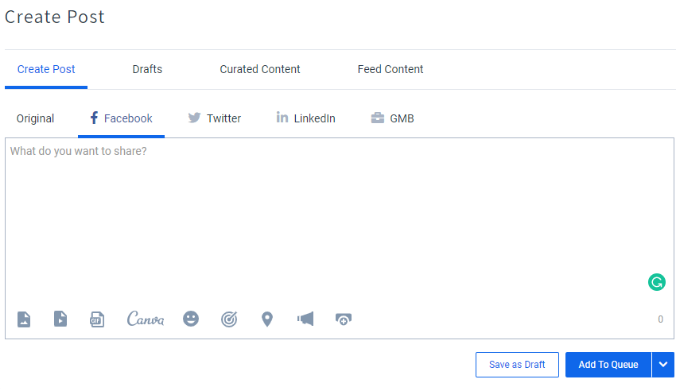
- Create a single image or album post: It has easy uploading facilities, wherein you can upload directly from Dropbox or your computer.
- Easy tagging options: To help expand your reach, SocialPilot lets you tag another Facebook account. Also, the tool enables you to tag the target location.
- GIFs: We all love humor! Give your readers a personalized touch by adding humor to your post.
- Customized graphics and emojis: You can add emojis and use Canva integration to design graphics for making your posts more expressive.
- Manage posts with controlled sharing: By setting up preferred and restricted audiences, manage every post.
- Boost post and call-to-action feature: Boost post does wonders to your organic posts while you drive more conversations using call-to-action buttons.
Once customization of your desired posts is done, you can schedule them right away by clicking on 'Add to Queue'. On the drop-down menu of 'Add to Queue,' select one of these options: Share Now, Share Next, Schedule Post, or Repeat Post.
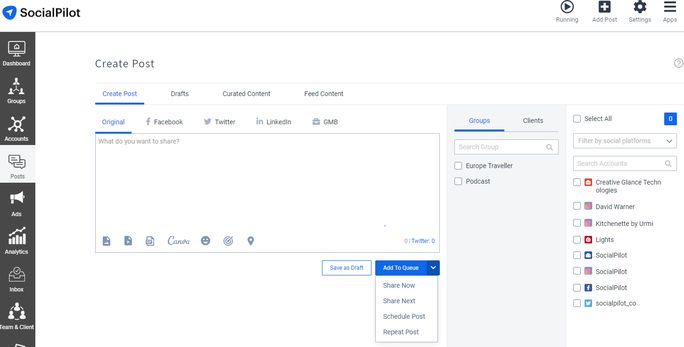
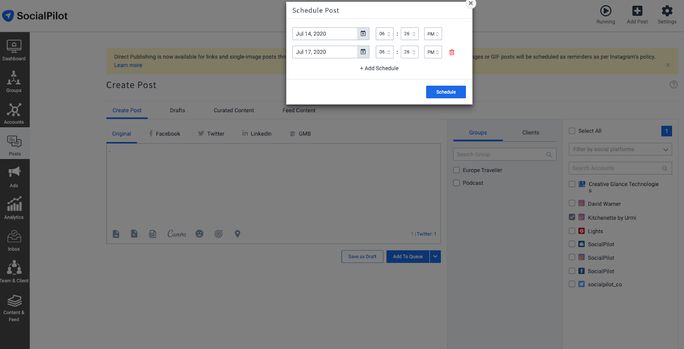
By clicking on the 'Schedule Post' option, you'll see a pop-up window where you can select the date and time for publishing that post. If you want to repeat this post over a period of time, click on '+ Add Schedule.'
Now, let's learn more about the seamless bulk scheduling process using the SocialPilot application. Note that the social media account selection procedure is the same for both kinds of scheduling.
Why should you Bulk Schedule your Posts?
Bulk scheduling comes with loads of benefits. Some of these are:
- It will save a lot of time.
- It can help you focus on productive marketing activities instead of spending time on regular manual posting.
- If you have planned your monthly social media marketing schedule, then the bulk schedule will enable you to reach your marketing goals faster.
The first step to bulk schedule is to log in and then upload all those posts you want to schedule on SocialPilot's dashboard.
How to Bulk Schedule using SocialPilot?

Follow these steps to use the bulk scheduling feature of SocialPilot:
Step 1: Log into the SocialPilot Panel.
Step 2: Select Post and click on the Bulk Schedule option.
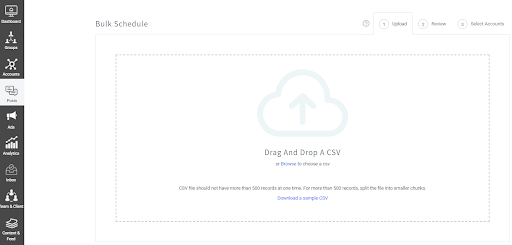
Step 3: Once you select the Bulk Schedule option, drag and drop your CSV file. Kindly note that the CSV file should not have more than 500 records at one time. In case you need to upload more than 500 files, please divide the files by ensuring that it is less than 500.
What is a CSV File?
Comma Separated Values (CSV) file is a plain text file that contains a list of data. CSV files serve various purposes. They help enterprises and businesses export a high volume of data to a more concentrated database. To learn more about how to create a CSV file for bulk upload, visit this page.
Step 4: Once you are done uploading files, you will be directed to the preview window. Review each image alongside the text content and edit or delete them if needed.
Step 5: Now click on the Select Account tab. You will be given two options: Post without Account and Post with Account. Here's the description of these features.
- Post without Account: For all those posts in which you have shared account ID in CSV files.
- Post with Account: For all those posts in which you have not mentioned the account ID in the CSV file.
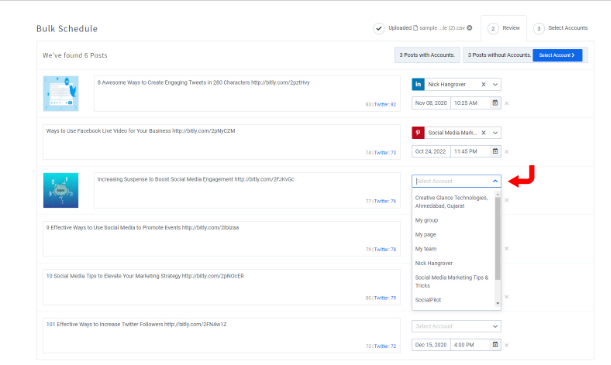
Step 6: Individually select the account for each post by clicking on the drop-down box present on the right side of each post. Here you can also choose a particular group or client.
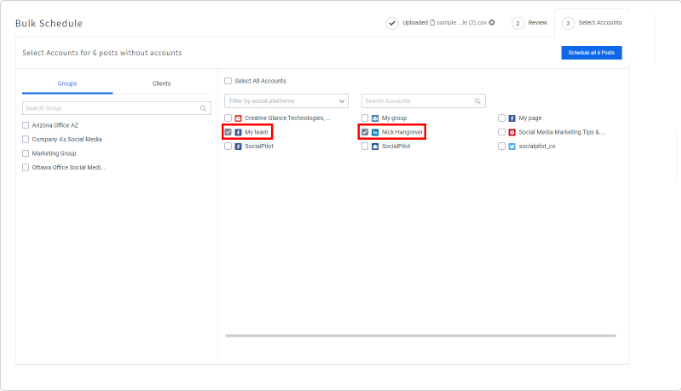
Step 7: Click on the Schedule all Posts button. Your posts are now scheduled for usage in the future.
Step 8: If you need to check your scheduled posts, click on the Posts icon and then select Manage Post.
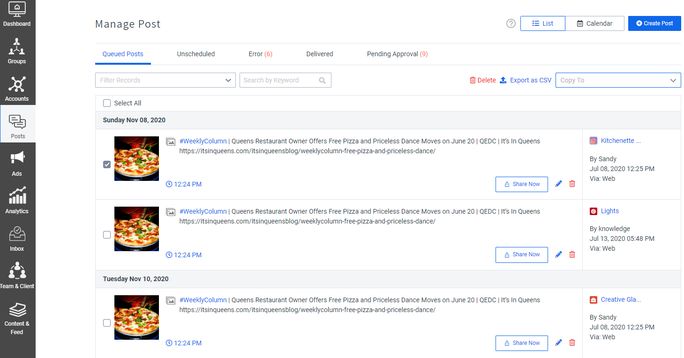
You can get a clear picture of all your scheduled and bulk scheduled posts in the Manage Post section. You can delete and edit posts in addition to various features from here.
What are the features available in 'Manage Post' and its benefits?
Here are the features you can access from the 'Manage Post' section:
- Queued Posts: This comprises a list of posts that are scheduled to be published. Queued posts can be filtered out based on different categories.
- Unscheduled: The post can go in an unscheduled category in many ways. Planned activities can be paused if required, and those posts will be shifted to the unscheduled category.
- Error: These posts are rejected by social media APIs. Undelivered posts can be tracked for further modification for sharing on Facebook later.
- Delivered: It reflects the number of posts shared in the last 90-120 days. You can revise and customize them to repost whenever you want.
- Pending Approvals: Posts that are yet to be approved from the concerned members overlooking the social media strategy for your agency or business.
How to Pause your Facebook Posting Schedule using SocialPilot?
Sometimes it becomes necessary to pause your scheduling or posting activities to avoid challenging or problematic circumstances.
Using SocialPilot's account, you can pause scheduled posts and avoid such situations.
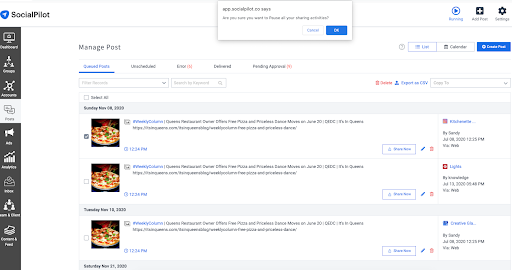
To pause your scheduled posts, open the 'Manage Post' page and click the number of posts that you want to pause.
Now, click on the 'Running' icon to pause your scheduled posts. Once you click the 'Running icon,' you see a dialogue box asking, 'Are you sure you want to pause all your sharing activities?'.
Once you confirm by clicking OK, then all your scheduled posts will be paused.

Conclusion
SocialPilot makes scheduling all your posts on Facebook easy, giving you a hassle-free experience. Through this platform, you will be able to manage your Facebook marketing and control actions on other social media sites at a competent price.
In addition to Facebook, SocialPilot enables you to manage 8 more social media platforms like Twitter, Instagram, LinkedIn, Tumbler, VK, TikTok, Google My Business, and Pinterest. Take its free trial today and multiply followers across all channels.
How To Create Scheduled Posts On Facebook Page
Source: https://www.socialpilot.co/blog/how-to-schedule-facebook-posts
Posted by: lujanthicents.blogspot.com

0 Response to "How To Create Scheduled Posts On Facebook Page"
Post a Comment